Deploying a Node.js application on a Virtual Private Server (VPS) gives you full control over your server environment, providing flexibility, scalability, and performance optimization. Whether you’re hosting a simple API or a complex backend system, managing the deployment yourself ensures that your application is secure, efficient, and running exactly how you intend it.
This in-depth tutorial will walk you through every step of deploying a Node.js app on a VPS, from selecting a server to setting up security and deploying your code. It’s tailored for beginners and developers looking to transition from local development to real-world hosting.
A. Why Choose a VPS for Node.js?
There are several compelling reasons to deploy your Node.js app on a VPS rather than on shared hosting:
A. Performance – With dedicated resources, you won’t be slowed down by other users on the same server.
B. Full Control – Root access means you can install custom software and configure the environment to your liking.
C. Scalability – As your app grows, you can upgrade your VPS resources with minimal hassle.
D. Better Security – VPS gives you the ability to implement and customize your own security policies.
B. Prerequisites Before Deployment
Before jumping into deployment, make sure you have the following:
A. A VPS with root or sudo access (Ubuntu 22.04 is recommended for this guide).
B. A domain name (optional, but highly recommended).
C. Node.js application ready for deployment.
D. Basic familiarity with using SSH and the Linux command line.
C. Step-by-Step Deployment Process
Let’s break the process into detailed, manageable steps.
1. Connect to Your VPS
You’ll first need to connect to your server using SSH:
Replace username with your VPS user (typically root or a sudo user) and your_server_ip with your server’s actual IP address.
2. Update and Secure Your Server
Start by updating the system packages:
It’s also wise to set up a firewall using UFW (Uncomplicated Firewall):
This will allow only SSH access by default. You can open additional ports later as needed.
3. Install Node.js and npm
Install Node.js using the NodeSource repository for the latest stable version:
Verify installation:
4. Install Git
Git is used for cloning your app from a repository like GitHub:
Clone your project:
5. Install Application Dependencies
Navigate into your app’s root directory and install the dependencies:
Make sure your app has a valid package.json file. You can run the application locally to test:
Or whatever file starts your app (server.js, index.js, etc.)
6. Use PM2 to Manage Your App
PM2 is a production-ready process manager for Node.js applications:
Start your app using PM2:
Set PM2 to start your app on server boot:
You can monitor your app with:
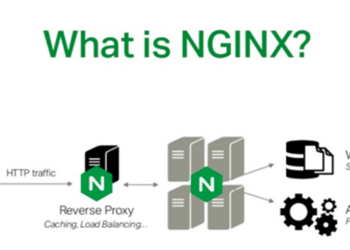
7. Install and Configure Nginx as a Reverse Proxy
Installing Nginx will help manage traffic and provide better performance:
Configure a reverse proxy so Nginx forwards requests to your Node.js app:
Paste the following configuration:
Enable the configuration and restart Nginx:
8. Optional: Secure with SSL Using Let’s Encrypt
Install Certbot:
Run Certbot to configure SSL:
Follow the prompts to enable HTTPS on your domain.
Test renewal:
9. Set Up a Custom Domain (Optional)
If you want to use a custom domain:
A. Go to your domain registrar’s DNS management.
B. Point an A record to your VPS’s IP address.
C. Wait for DNS propagation (can take up to 48 hours).
Once DNS is configured, Nginx and SSL will handle the rest.
10. Automate Deployment (Optional)
You can use tools like GitHub Actions or a CI/CD pipeline to automate deployment steps:
A. Pull latest code
B. Install dependencies
C. Restart PM2 process
This keeps your application always up to date.
D. Common Issues and How to Fix Them
A. App crashes after deployment – Use pm2 logs to check the issue.
B. Port conflicts – Ensure only one app is listening on a specific port.
C. Nginx 502 Bad Gateway – Verify the app is running on the correct port and Nginx is forwarding correctly.
D. Firewall blocking traffic – Use ufw allow 'Nginx Full' to open necessary ports.
E. Maintaining and Monitoring Your VPS
Routine maintenance ensures your server stays healthy:
A. Regularly update the OS and packages:
B. Use monitoring tools like Netdata, htop, or server dashboards.
C. Schedule automatic backups or use snapshot features provided by your VPS host.
D. Harden SSH access by changing the default port or using key authentication.