• About Us
  • Disclaimer
  • Indeks
Kebumen Update
No Result
View All Result
  • Web Hosting and Server Management
  • Monitoring & Maintenance
  • Security & Hardening
  • Panels & Tools
  • Cloud & DevOps
  • Tech
  • Web Hosting and Server Management
  • Monitoring & Maintenance
  • Security & Hardening
  • Panels & Tools
  • Cloud & DevOps
  • Tech
No Result
View All Result
Kebumen Update
No Result
View All Result
Home Web Hosting and Server Management

Host a Website Using Apache or Nginx

awbsmed by awbsmed
April 12, 2025
in Web Hosting and Server Management
0
Install an NGINX web server on Ubuntu and create a website! | by Terminals  & Coffee | Medium
ADVERTISEMENT


Hosting your own website gives you total control over your content, performance, and security. Whether you’re a developer, blogger, or small business owner, understanding how to host your website using Apache or Nginx on your own server is a valuable skill. These two web servers are the most popular and reliable options for managing websites, with Apache being known for its flexibility and Nginx for its speed and low resource usage.

READ ALSO

Building a Secure FTP Server with vsftpd on Linux

Deploying Node.js Apps on VPS: Complete Guide

In this complete guide, we’ll walk you through everything from choosing a server, installing Apache or Nginx, configuring your domain, securing your site with HTTPS, and deploying your website to the public internet — all while focusing on SEO best practices and smooth user experience.


A. Why Self-Host Your Website?

Hosting your own website has many advantages, especially for those who want more than what basic shared hosting offers.

A. Total Control – You’re in charge of the software, hardware, and server settings.
B. Cost Efficiency – Avoid long-term hosting fees by using a VPS or local machine.
C. Customization – Install only the software you need.
D. Learning Opportunity – Gain in-depth knowledge about server management and web technologies.
E. Better Security – Implement your own security standards and measures.


B. Understanding Web Servers: Apache vs. Nginx

Before starting, it’s important to know the difference between Apache and Nginx.

Apache:

A. Developed by the Apache Software Foundation.
B. Module-based and highly customizable.
C. Works well with .htaccess files.
D. Great for small to medium-sized websites.
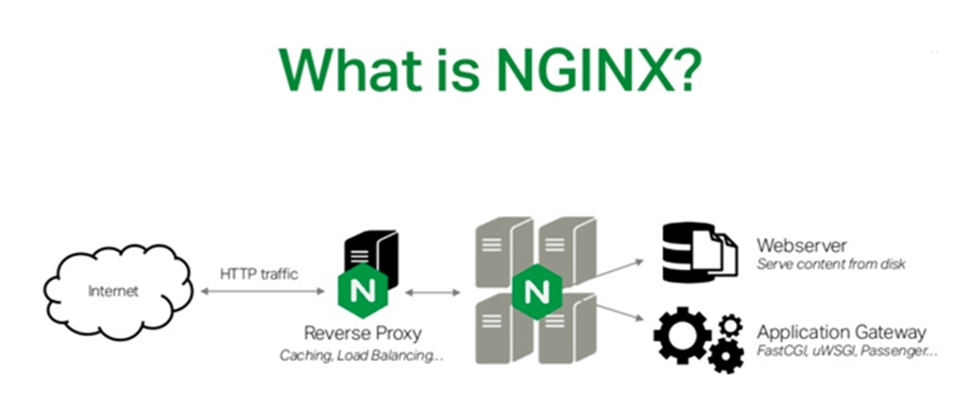
Nginx:

A. Pronounced “Engine-X”.
B. Known for high performance and low memory usage.
C. Ideal for serving static content and handling large traffic.
D. Often used as a reverse proxy or load balancer.

Both servers are excellent choices. Apache is generally easier to configure for beginners, while Nginx is often favored for high-performance environments.


C. Prerequisites for Hosting a Website

Before hosting your website, make sure you have the following:

A. A VPS or dedicated server (Ubuntu 22.04 recommended).
B. SSH access with root or sudo privileges.
C. A domain name (optional but recommended for production).
D. A website or basic HTML files ready to deploy.
E. Familiarity with Linux terminal commands.


D. Setting Up Your VPS

If you’re using a VPS (e.g., DigitalOcean, Linode, or AWS):

  1. Connect to your server via SSH:

bash
ssh your_user@your_server_ip
  1. Update system packages:

bash
sudo apt update && sudo apt upgrade -y
  1. Set up a firewall to secure your server:

bash
sudo ufw allow OpenSSH
sudo ufw enable

E. Installing Apache Web Server

To use Apache, follow these steps:

  1. Install Apache:

bash
sudo apt install apache2 -y
  1. Allow web traffic through the firewall:

bash
sudo ufw allow 'Apache Full'
  1. Enable and start Apache:

bash
sudo systemctl enable apache2
sudo systemctl start apache2
  1. Test in your browser by visiting your server’s IP — you should see the Apache default page.


F. Installing Nginx Web Server

Alternatively, to use Nginx:

  1. Install Nginx:

bash
sudo apt install nginx -y
  1. Open HTTP and HTTPS ports:

bash
sudo ufw allow 'Nginx Full'
  1. Enable and start Nginx:

bash
sudo systemctl enable nginx
sudo systemctl start nginx
  1. Visit your IP address in a browser. You’ll see the Nginx welcome page if it’s working.


G. Uploading Your Website Files

Now that the web server is running, upload your HTML files.

For Apache:

A. Default root directory: /var/www/html
B. Replace the index.html with your own:

bash
sudo rm /var/www/html/index.html
sudo cp /local/path/to/your/index.html /var/www/html/

C. Set proper permissions:

bash
sudo chown -R www-data:www-data /var/www/html
sudo chmod -R 755 /var/www/html

For Nginx:

A. Default root directory: /var/www/html
B. Upload your files similarly:

bash
sudo cp -r /local/path/to/site/* /var/www/html/

C. Adjust permissions as shown above.


H. Configuring Virtual Hosts

For hosting multiple websites on the same server:

Apache Virtual Host:

  1. Create directory:

bash
sudo mkdir -p /var/www/yourdomain.com/public_html
  1. Assign permissions:

bash
sudo chown -R $USER:$USER /var/www/yourdomain.com/public_html
  1. Create virtual host file:

bash
sudo nano /etc/apache2/sites-available/yourdomain.com.conf

Add this content:

apache
<VirtualHost *:80>
ServerAdmin admin@yourdomain.com
ServerName yourdomain.com
ServerAlias www.yourdomain.com
DocumentRoot /var/www/yourdomain.com/public_html
ErrorLog ${APACHE_LOG_DIR}/error.log
CustomLog ${APACHE_LOG_DIR}/access.log combined
</VirtualHost>
  1. Enable site and reload Apache:

bash
sudo a2ensite yourdomain.com.conf
sudo systemctl reload apache2

Nginx Server Block:

  1. Create a directory:

bash
sudo mkdir -p /var/www/yourdomain.com/html
  1. Set permissions:

bash
sudo chown -R $USER:$USER /var/www/yourdomain.com/html
  1. Create server block:

bash
sudo nano /etc/nginx/sites-available/yourdomain.com

Add:

nginx
server {
listen 80;
server_name yourdomain.com www.yourdomain.com;
root /var/www/yourdomain.com/html;
index index.html;
location / {
try_files $uri $uri/ =404;
}
}

  1. Enable and reload:

bash
sudo ln -s /etc/nginx/sites-available/yourdomain.com /etc/nginx/sites-enabled/
sudo nginx -t
sudo systemctl reload nginx

I. Connect Domain Name to Server

To connect a domain:

A. Go to your domain registrar’s dashboard.
B. Set the A record to your VPS IP address.
C. Wait for DNS propagation (usually within a few hours).


J. Secure Your Website with SSL (HTTPS)

Using Let’s Encrypt:

  1. Install Certbot:

bash
sudo apt install certbot python3-certbot-apache -y

Or for Nginx:

bash
sudo apt install certbot python3-certbot-nginx -y
  1. Obtain SSL:

bash
sudo certbot --apache

or

bash
sudo certbot --nginx
  1. Automatic renewal:

bash
sudo certbot renew --dry-run

K. Troubleshooting Common Errors

A. 404 Not Found – Check root directory paths and file permissions.
B. 403 Forbidden – Review file ownership and access rights.
C. SSL Errors – Verify DNS is correctly configured before requesting an SSL certificate.
D. Website Not Loading – Restart Apache/Nginx and double-check server block or virtual host settings.
E. Firewall Issues – Ensure UFW allows HTTP and HTTPS traffic.


L. Optimize for SEO and Speed

A. Use descriptive meta titles and descriptions.
B. Compress images to reduce load time.
C. Minify HTML, CSS, and JS files.
D. Enable browser caching via .htaccess or Nginx config.
E. Use Google PageSpeed Insights to analyze performance.


M. Monitor and Maintain Your Web Server

A. Regularly update your OS and software:

bash
sudo apt update && sudo apt upgrade -y

B. Check server uptime and load:

bash
uptime
htop

C. Back up site data weekly or daily.
D. Review access logs for unusual traffic.


Tags: apache serverlinux server setupnginx hostingself-hosted websitevps web hosting
ADVERTISEMENT

Related Posts

Install and configure an FTP Server in Linux CentOS 7.x with VSFTPD
Web Hosting and Server Management

Building a Secure FTP Server with vsftpd on Linux

April 12, 2025
How To Install Node.js 20 LTS on Ubuntu 22.04|20.04|18.04 | by Navdeep  Sidana | Medium
Web Hosting and Server Management

Deploying Node.js Apps on VPS: Complete Guide

April 12, 2025
How to Install LAMP on Ubuntu 20.04 with Screenshots - Pentarock  Technologies
Web Hosting and Server Management

LAMP Stack Installation on Ubuntu 22.04

April 12, 2025
How to Set up a VPS Hosting Environment from Scratch? -
Web Hosting and Server Management

How to Set Up a VPS from Scratch

April 12, 2025
Next Post
Install and configure an FTP Server in Linux CentOS 7.x with VSFTPD

Building a Secure FTP Server with vsftpd on Linux

Leave a Reply Cancel reply

Your email address will not be published. Required fields are marked *

High-Performance Servers Ensure Future-Proof Tech

High-Performance Servers Ensure Future-Proof Tech

by Salsabilla Yasmeen Yunanta
August 26, 2025
0

The year 2025 marks a new era in the world of computing, where the demand for speed, efficiency, and scalability...

Server Boosts Become A Strong Mechanism for Communities

Server Boosts Become A Strong Mechanism for Communities

by Salsabilla Yasmeen Yunanta
July 31, 2025
0

In the rapidly expanding digital landscape, where online communities thrive as hubs for connection, collaboration, and shared interests, the concept...

Advance Server Allows Game Developers to Optimize Feedback

Advance Server Allows Game Developers to Optimize Feedback

by Salsabilla Yasmeen Yunanta
July 31, 2025
0

In the fast-paced, ever-evolving world of online gaming, where user experience and competitive balance are paramouthe purpose, operational mechanics, and...

Powering Digital: Backend Innovations Surge

Powering Digital: Backend Innovations Surge

by Salsabilla Yasmeen Yunanta
July 25, 2025
0

The visible elegance of a website or mobile application, the smooth user experience, and the instant responsiveness we've come to...

Kebumen Update

KebumenUpdate.com diterbitkan oleh PT BUMI MEDIA PUBLISHING dengan sertifikat pendirian Kementerian Hukum dan Hak Asasi Manusia Republik Indonesia Nomor: AHU-012340.AH.01.30.Tahun 2022

  • About Us
  • Editor
  • Code of Ethics
  • Privacy Policy
  • Cyber Media Guidelines

Copyright © 2025 Kebumen Update. All Right Reserved

No Result
View All Result
  • Homepages
    • Home Page 1
    • Home Page 2
  • Tech

Copyright © 2025 Kebumen Update. All Right Reserved